
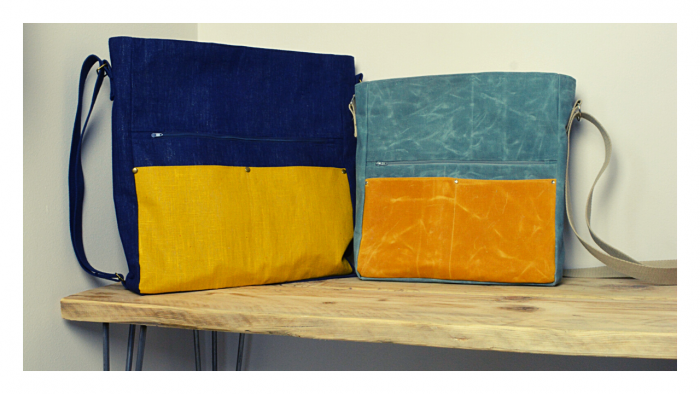
This waxed tote bag pattern comes in two sizes, choose the size that suits you! I have made this bag with fabric bought on a french market, I have limited french so I am guessing that it is linen with a plastic backing. A waxed canvas works well for this bag design.


This tote bag pattern comes in two sizes – large and medium. The finished large bag measures 16 1/2″ high, 15″ wide, 4″ deep, the medium measures 14″ high, 12 1/2″ wide and deep 3 1/4″.
Where to source fabric?
Here in the UK waxed canvas is not readily available – I chose to order through Etsy and patiently waited for a delivery from abroad. The larger bag is made from a synthetic waxed fabric bought from a market stall in France, it feels like the wrong side is coated with a thin layer of plastic, this fabric is often used for table cloths. The smaller tote is made from wax canvas.
Working with Waxed Canvas
It is worth spending time testing the tension of your sewing machine with waxed canvas. Before starting to sew up this bag I tested three different sewing machine feet and chose to stitch with a denim thread for strength, due to the weight of the waxed canvas. For further hints and tips check out my post 11 Top Tips For Sewing Waxed Canvas.
Interfacing
This bag comes in two sizes, with a choice of fabrics. It is not possible to successfully adhere the interfacing to the waxed canvas. So what to use to add structure to the bag? The larger bag is made of a fabric lined with plastic so I have used Decovil 1 on the inside of the outer fabric with interfacing for the lining. The smaller bag is made with waxed fabric, due to the structure this already has (due the fabric’s weight) and the size of the bag I have chosen to add fusible fleece to the lining. Experiment with samples of your fabric and different interfacing options – bear in mind the finished size of the bag and how structured you would like the finished bag to be. Check out my post Choosing the right interfacing for bags.
If you are relatively new to bag making you may wish to check out my Bag Making for Beginners Course. This includes many free bag patterns including Leather Tote Bag Pattern or if you are a confident bag maker I have a Rolltop Mini Backpack Pattern

I appreciate these instructions are rather long, if you wish to support me for less than a cup of coffee you can buy this tutorial as an ad free PDF over in my Etsy shop – UK price £2.
Waxed Tote Bag
The large wax canvas tote bag pattern pieces:
- Bag base main fabric 15 1/2 by 5 ” (canvas fabric or similar durable fabric)
- Bag sides main fabric 17 1/2 by 5″
- Front bag pieces main fabric 15 1/2 by 11″ and 15 1/2 by 7″
- Back bag piece main fabric 15 1/2 by 17 1/2″
- Front zip tabs two pieces main fabric 4 by 1 1/2″
- Front pocket contrasting fabric 17 1/2 by 15 1/2″
- Front zip pocket lining 13 1/2″ by 10 1/2″ (I like to use cotton fabric for lining)
- Bag base lining 15 1/2″ by 5″
- Bag sides lining fabric 17 1/2 by 5″
- Back and front bag piece two pieces lining fabric 15 1/2 by 17 1/2″
- 14″ zip which co-ordinates with outer bag colour
- 3 double cap rivets
- 17″ zipper
- Zip Bridge fabric four pieces 15″ by 2 1/2″
- Zipper Tab 3 1/2 by 1 1/4″
- Internal slip pocket 15″ by 6″
- Row of slip pockets at base of inner bag 15″ by 15″
- 2 D Rings and 1 slider
- 2 1/2 yards of webbing for bag strap
- Your choice of interfacing, bag base, sides and front and back bag panels
Medium Waxed Tote Bag pattern pieces:
- Bag base main fabric 13 1/2 by 4 1/4 ”
- Bag sides main fabric 15 by 4 1/4″
- Front bag pieces main fabric 13 1/2 by 8 3/4″ and 13 1/2 by 6 3/4″
- Back bag piece main fabric 13 1/2 by 15″
- Front zip tabs two pieces main fabric 4 by 1 1/2″
- Front pocket contrasting fabric 13 1/2 by 15″
- Front zip pocket lining 13 1/2″ by 7 1/2″ and one piece 13 1/2 by 8 1/2″
- Bag base lining fabric 13 1/2 by 4 1/4”
- Bag sides lining fabric 15 by 4 1/4″
- Front and back bag two pieces lining fabric 13 1/2 by 15″
- 12″ zip which co-ordinates with outer bag color
- 3 double cap rivets
- 12″ zipper for recessed zipper
- Zip Bridge fabric 2 pieces 3 1/2″ by 13″
- Internal slip pocket 15″ by 6″
- 2 D Rings and 1 Slider
- 2 1/2″ yards of webbing for bag strap
- Your choice of interfacing, bag base, sides and front and back bag panels
Helpful tools
This post contains affiliate links, which means I get a small % back if you purchase after clicking, at no cost to you- see my disclosure policy.
- Quilters ruler
- Rotary cutter
- Hole punch
- Wonder Tape or Fabric Tack glue
- Denim thread (if sewing waxed canvas)
- Bulky Seam Aid
The seam allowance for this bag is 5/8″.
The written instructions relate to the larger bag, the video to the medium bag.
You will note that the video instructions use alternative methods to achieve the same results. Namely, the lining of the front zipper pocket the lining for the pocket is the full width of the bag and finished inside the side seam of the bag, removing the need for hand stitching. Secondly, the method for creating the zipper bridge for the recessed zipper uses two pieces of fabric rather than four and uses fabric glue rather than wonder tape.
FRONT CONTRASTING POCKET
Fold contrasting external fabric pocket in half. Press, then topstitch along the pressed fold – this will be the top of the pocket.

Place the fabric so the bottom of the pocket is aligned and matches the edge of the main bag fabric, piece measuring 15 1/1 by 11″.
Pin at the edge. Lightly mark a central line down the pocket. A quilter’s ruler will help you draw a straight line, as it will show you the right angle along the base of the bag.

Stitch alongside the central line, 1/8″ from the central line, from the base up to the top of the pocket, pivot stitch across the top 2/8 “, pivot and stitch back down to the base of the bag. This creates two parallel lines of stitching.
Insert a cap rivet on the pocket fabric, at the top of the pocket between the two lines of stitching.
To insert a cap rivet, using a hole punch punch a hole through the fabric.

Insert the double cap rivet, using a hammer bang the two sides together. Later we will be adding cap rivets to the sides of the pockets, once we have stitched the side panels on.

Baste around the sides of the pockets, within the seam allowance.
FRONT ZIP POCKET
Start with making the zipper tabs, press in 1/4″ along the two short edges of the zipper tab. Fold the zipper tab in half.

Place the zipper end in between, to create a sandwich of fabric, zipper, fabric. Stitch to secure.
Repeat for the second side of the zipper. Place the zipper right side facing the right side of your fabric (Front bag piece main fabric 15 1/2 by 11).

Place the smaller piece of zipper pocket fabric along the edge of the zipper to create a sandwich of fabric and zipper, with the right sides of the two fabrics facing each other.
Stitch to secure using a zipper foot.

Fold the fabric away from the zipper and press. Pin then topstitch to secure.
Repeat for the second side of the zipper, creating outer fabric, zipper and pocket lining sandwich. I like to tack before topstitching parallel to the zipper.

Next turn the front of the bag over so the wrong side facing you. Fold the pocket linings downwards to face the bottom of the bag and pin the edges of the pocket lining together.

Machine stitch the pocket linings together and as close to the zipper as possible. Hand stitch along the side edges of the zipper to finish the pocket.
SEW UP OUTER BAG
Place a side panel, right sides together, along the side edge of the front panel. Machine stitch the seam, stopping 5/8″ from the bottom, ensure you backstitch at each end of the seam. Open out.
Insert a cap rivet at the edge of the now finished front pocket. If you need further information checkout my detailed post on how to insert cap rivets.

Repeat for the other side panel.
Adhere your bag base interfacing to the wrong side of the bag base. If you are using waxed fabric baste into the seam allowance, or place into the bag base once the other bag is stitched up.

Stitch the bag base into place along the bottom of the bag, stopping 5/8″ from the end, right next to your side panels. Then sew the side seams.

Now lets sew the back of the bag in place. Pin in place and sew each seam, stopping 5/8″ from the corners at the base of the bag.
Cut two pieces of webbing 5″ long, thread a D ring through one piece. Fold the webbing into a loop and pin on to the side of the bag so the loop is 2″ down from the top of the side panel, the join in the loop faces the bag panel. Stitch into place, I stitch a square and then diagonally across the square for added strength. We will finish the rest of the strap as the final step in making the bag.

INNER BAG POCKETS
The first pockets we are creating is a row of slip pockets at the base of the bag (like in a changing bag), this is only included in the measurements of fabric for the larger bag (and therefore likewise is not included in the video). Fold the square slip pocket fabric in half, top stitch along the fold.

Place so the long raw edge aligns with the base of one of your bag lining pieces. Divide into three sections with two lines, 5 1/2″ in from each side edge. I find a quilters ruler very helpful for marking at right angles to the base of the bag. Stitch your two lines ensuring you backstitch at the top of each line. Then baste around the sides and the base of the pocket fabric, securing to the bag lining within the seam allowance.

Now let’s sew one small slip pocket, designed as an ideal size for mobile phones.
Fold your 15 by 6 piece of fabric in half, and sew the two side seams. Turn inside out.

Fold in the raw edge and press.
Place the pocket, centrally onto the opposite lining fabric piece, 3 1/2″ down from the top. Ensure the pressed in raw edges are facing the bottom of the bag.

Top stitch the sides of the pocket and along the bottom, ensure you top stitch at the top of each side.
RECESSED ZIPPER CLOSURE
Let’s start by making a zipper tab for the end of the zip. Take your piece of fabric, which is 3 1/2 by 1 1/4″, press in the edges so the width is the same as the zip. Then fold in half.

Fold over encasing the zipper in the fabric tab. Machine or hand stitch the fabric tab.

Cut four pieces of iron-on interfacing without seam allowances and apply to the reverses of the four fabric strips, following the manufacturer’s instructions. I strongly suggest using a quilters ruler and rotary cutter to cut as accurately as possible as this will make your finished recessed zipper as professional as possible.

Cut small pieces of wonder tape and place it on the corners of the interfacing. Peel the paper off and fold in the corners, press lightly. The wonder tape acts a temporary glue whilst you make the recessed zipper but then washes away, it does not replace stitching your recessed zipper!
Fold in the sides of the four panels, press with a hot iron.
Add a strip of wonder tape along one edge.

Place the zip along your edge, held temporarily in place with the wonder tape.

Place the second strip of fabric on top, encasing the zip. Tack the two layers of fabric together. Repeat for the second side of the zip.

Machine stitch the two short sides and the zip side.
Now its to add the recessed zipper to your lining fabric for your bag.
Place onto one side of your lining fabric and stitch into place (centrally), for this bag I have placed it 1 1/2” down from the top.

Repeat for the second side of the lining. Once stitched remove your tacking stitches.

SEW UP LINING
Sew up the lining into bag form, as you did for the outer bag. You may find it easier to unzip the zipper.
COMPLETE THE BAG
Place the outer bag inside the lining bag so the right sides are facing each other. Stitch around the top of the bag, leaving a large turning gap, personally I prefer to leave this at the back of the bag.
Pull the bag through the turning gap. Turn in the raw edges (your turning gap) and hold in place. Top stitch around the top of the bag, closing this pressed in turning gap.


ADJUSTABLE STRAP
Lastly, let’s finish the shoulder strap. Cut a piece of webbing 70″ long. Zigzag stitch the raw ends. Thread one end of your webbing through the slider, fold back and stitch to secure.
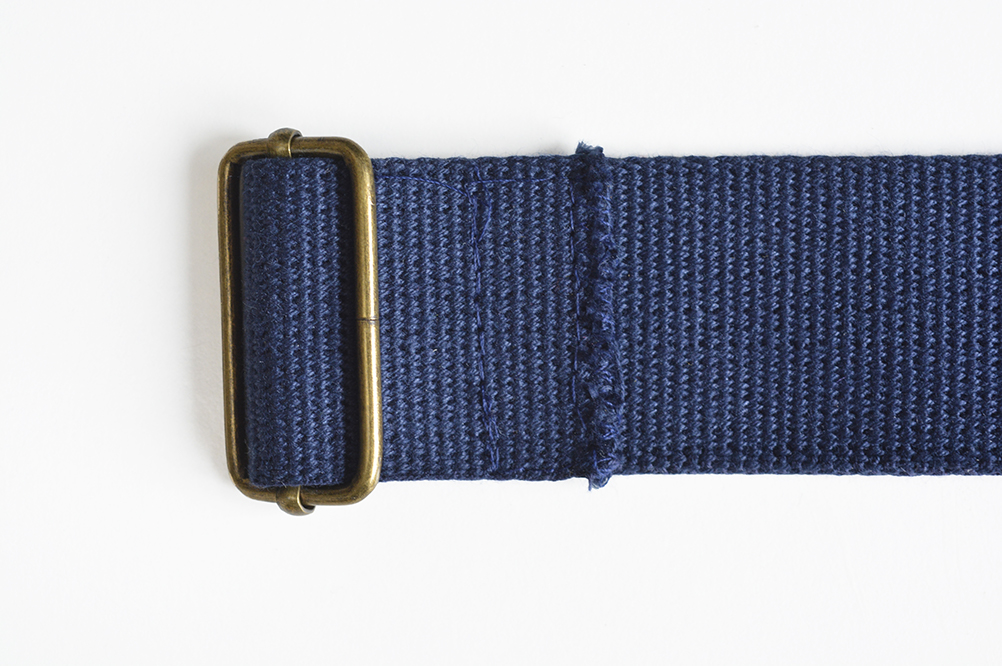
Next thread your webbing through one of the D rings then back through the slider.

Lastly thread through the other D Ring, fold and stitch to secure.

That’s it one durable tote bag finished – I hope you love it as much as I do my version.
If you love making bags out of a variety of materials check out these free bag patterns:
Upholstery Fabric Mini Backpack Pattern

Peg
Saturday 18th of December 2021
OMG, thanks for the pattern and the detail. I have been keeping a piece of waxed canvas for just this bag. I had such a limited size that it has sat for awhile. This pattern Fits! Woo-Hoo Can not wait to get started.
Vicky
Monday 20th of December 2021
Excellent, enjoy your making :)