
It brings me great delight to sew for my niece and nephew – they live in Amsterdam so I don’t get to see them as much as I would like. I love sewing for them, I am sure you also love sewing for toddlers – today I am sharing with you my free children’s bag pattern.
Last week my Mum and Dad visited them, having a lovely time in the sunshine. Flo decided she would like a yellow bag to be like Gran, to carry her snack and water bottle in on days out. Sharing colors via text is not great, I was a little surprised when she chose the golden fabric from my stash. I couldn’t resist making the toddler bag reversible with a fun vibrant fabric on the inside. My hunch is that when she sees the bag she will prefer the vibrant flowers over the golden fabric.
This children’s bag is made to Flo’s water bottle measurements (20 by 7cm) with measurements of strap length from my Mum of 60cm. The bag does seem a little large in comparison to the strap but does fit with the request. It would be super easy to alter this to fit you – just add a longer strap. Or make the bag smaller by reducing the pattern pieces.


Personally I am rather passionate about bag making – if you are new to bag making I have the perfect Beginners Bag Making Course for you which covers so many essential skills for bag making, and includes many free bag tutorials.

Free children’s bag pattern
This post contains Amazon affiliate links for your convenience. Click here to see my disclosure policy.
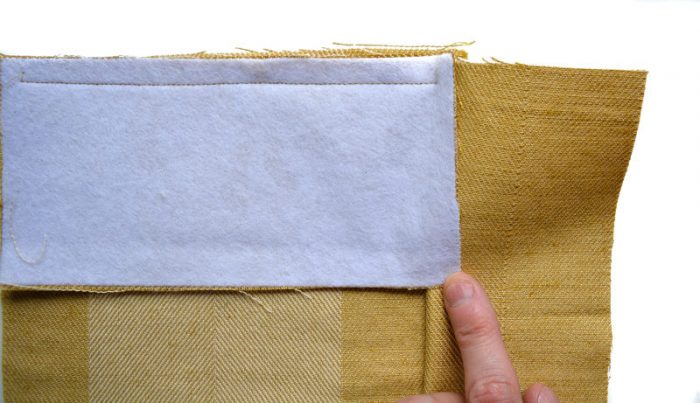
- Front and back of bag 24 by 18 cm (9 1/2 by 7 1/8″) cut two in the following: fabric A, fabric B, heavyweight interfacing, fusible fleece.
- Side panels 24by 9cm (9 1/2 by 3 1/2″), cut two in the following: fabric A, fabric B, heavyweight interfacing, fusible fleece.
- Bottom of the bag 16 by 5″, cut one in the following: Fabric A, fabric B, fusible fleece, iron on heavyweight interfacing
- Closure flap 14 by 18cm (5 1/2 by 7 1/8″) cut one in the following: fabric A, fabric B, heavyweight interfacing, fusible fleece.
- leather strap 64 cm by 1.5 cm (25 by 3/4″)
- leather piece 10 by 1/2cm (4 by 1/4″) for button closure
- Four double cap rivets
- two large buttons
- hole punch
Cut out pattern pieces. Adhere heavyweight interfacing to the back of one of the fabrics. Adhere fusible fleece to the back of the second fabric.

Create the main body of the bag.
With fabric A pin a side panel right sides together to front panel. Stitch from the top with a 1/2cm seam allowance, stopping 1/2 cm before the end (or in inches 1/4″).

Pin the base piece of fabric, stitch starting and stopping 1/2 cm in from the edge.
Join the base panel to the side panel.
Pin then stitch the other side panel, sew from the top but at the base stop a 1/2cm before the end. This creates a comfortable box corner.

Repeat with the other side of the bag.

Repeat these steps with fabric B.
Pin the leather loop to the central point of the flap. Baste in place.

Place the right sides of the flap together stitch around three sides (including the button loop side).
Trim corners.

Turn right side out and press. Top stitch around the finished edges.

Pin the flap to the back of the corresponding fabric (in my case golden to golden). Baste in place.
Turn one bag right sides out, place inside the second bag so right sides are together. Check they fit snugly. If need be, adjust a side seam for a good fit. Pin around.

Stitch around the top of the bag, allowing a turning gap.

Turn right sides out. Press, pin, then top stitch along the top of the bag, encasing the raw edges.

Using a hole punch cut two holes vertically parallel to each other about 2-3 cm (an inch) down (centrally) on the side panels.

Insert double cap rivets following instructions provided in the set to secure strap in place.
Sew your buttons in place, one on each side of the bag.

If you liked this tutorial you may enjoy my busy toddler bag with a huge variety of fastenings for them to play with, or if you are looking for yourself check out my free bag patterns.

Beryl
Friday 21st of September 2018
Hi Vicky, I just discovered your site and have found lots of things to try. Thank you for sharing your creativity! I am wondering on the toddler bag - What are the measurements for the bottom piece? I am working in inches. Thank you!
Julie
Friday 25th of May 2018
Such a sweet little bag Vicky, it's nice to be able to make just the right thing for a purpose isn't it?! The great thing about this though is that it could be sized up to suit anyones specific needs (or water bottle size!)